Meta

  • Log in
  • Entries feed
  • Comments feed
  • WordPress.org
The Drawing Website

The Drawing Website

Draw better than a three year old
  • If You’re New, Start Here
  • Lvl. 0
  • Lvl 1
  • Lvl 2
  • Join Draw Fu Course
  • My Account
    • Logout
  • Recommended Reading
  • Shop
  • Checkout
  • Cart
  • About The Author

Empty Slideshow

You have no posts selected for your slideshow!
Check your theme settings for the global slideshow or the page settings for page slideshows...
and write a post! Check the FAQ for more.

Draw Fu Guide to Sketching And Gesture Foundations

August 12, 2023 in Lvl 2

The Problem With Starting A Drawing

The moment you start drawing, you mess up and you erase.  Then you try again, only to mess up again and erase.  Doing this a few more times and you give up.

Why can't you draw well?!

If this sounds like you, I can tell you right away, your whole mindset is wrong.  You may have seen someone online start with an eyeball or start in a corner of a page with a marker and draw something incredible, but people like that are outliers.

They don't draw like most professionals do.

Drawing Like A Master

You, me and many of the great masters have to "build" to a beautiful final drawing.  You do this by sketching.  Sketching is everything. 

It's the foundation of all the drawing you will do everytime you draw.

Sketching tells you:

  • How much space on your paper you'll take up.
  • Where to start drawing.
  • What you'll be drawing.
  • Where you're headed with your drawing.
  • What outside information, if any, you will need to finish your drawing.

It's the foundational blueprint of anything you want to draw.  It's perhaps the most important step in a drawing. 

How Is It Done?

This is what this lesson is all about. In this lesson we'll tackle:

  • How to tackle a blank page.
  • What to sketch with as a beginner.
  • Four different types of mark making.
  • How to sketch objects, landscapes and people from life.
  • How to sketch objects, landscapes and people from imagination.

Here's a preview of the first two videos:

If this sounds like the very thing you need, click the link below to learn everything you need to know about this vitally important, foundation drawing discipline.

https://the-drawing-website.teachable.com/p/draw-fu-guide-to-sketching-and-gesture-foundations

See you there!

Share this:

  • Tweet
  • Reddit
  • Share on Tumblr
  • Email

Like this:

Like Loading...

Comments Off on Draw Fu Guide to Sketching And Gesture Foundations

Cartoon Clothes Formulas

May 9, 2018 in Intermediate, Lvl 1

Cartoon Clothes Formulas

We've learned formulas for every body part, however, people don't tend to walk around naked. We're usually wearing something. That something often wrinkle up and fold around us as we move.

In this lesson, we'll be dealing with how to handle drawing cartoon clothes.  Specifically how to draw wrinkles and folds.

Here you will find:

  • Simple Cartoon Folds
  • The Four Most Common Cartoon Folds: Pipe Fold, Half Lock Fold, Spiral folds, Zig Zag Fold
  • Fold Thickness and Fold Origin Points: Fabric Types, Support Points and Pinch Points
  • Using Fold to Describe Form
  • Costume and Clothes Ideas
  • Applying The Folds to Cartoon Styles

There's a lot to this topic and I'm not even telling you all of it.  Just enough to get your cartoons to look right.  So let's get to it.

Simple Cartoon Folds

The simples folds in cartoons can be done with bumps in just the right spots.  It's not too difficult and early comic strip cartoons used them all the time.  If you don't want to get into anything complicated, this is the way to go:

However, when these types of simple folds are no longer enough and you want to have something that feels more natural, then it's time roll up your sleeves and get to know a bit more about how folds work...

The Four Most Common Cartoon Folds

For the sake of this lesson, I decided to distill the information into the folds most used in cartoons.  These are not all the folds there are. There are a few other fold types I won't be covering here.

I'll explain the folds from what I think, are the easiest folds to understand to the trickiest.

Pipe Fold

When cloth hangs off a support point and simply gets pulled down by gravity, we get pipe folds.  Pipe folds are cylindrically shaped folds, similar to a pipe.

From beneath, they often create multiple half pipes attached together.  They look like this:

This is the easiest fold to wrap your head around. These fold are commonly seen in skirts, capes, and most articles of clothing that loosely hangs off a person.

Spiral folds

Spiral folds are simple to understand as well.  In fact, the bumps used to create simple cartoon folds as explained above are more often than not, spiral folds.

Spiral folds are simply small cylinders that wrap around a body part like a spiral.  They occur, mostly,  when tight or form fitting cloth bunches up.

They're ideal for defining the direction of the body part underneath the cloth.

Half Lock Fold

This is when things start getting a tad tricky.  Half locks are folds that are created when two sections of the same piece of cloth interlock.  There are two types.  A single half lock and a double half lock.

The single half occurs when one part of the cloth goes into another.

The double occurs when to parts of the cloth come together and the cloth inverts and pushes out against itself:


This is extremely common. It happens in pant legs and shirt sleeves anytime they bend.

This means this type of fold comes up a lot. So learn to draw it.  It will immediately make your clothed cartoons look more natural.

Zig Zag Fold

I find zig zag folds to the the trickiest of all the folds. They're sometimes made up of Pipe folds that are bunched up:

Bottom of pants legs and shirt sleeves are where you tend to see them.

Fold Thickness and Fold Origin Points

Now that you know some fold types to use, the tricky part is finding out how thick they should be and where best to put them.  The answer comes when you think about  gravity, material of the fabric and points of origin.

Fabric Types

It's important to know what material makes up the clothes.

Thinner fabric will have thinner folds and more of them.

Thicker fabric will have bigger folds and less of them.

But you can still simplify the amount.  Less is often more.

The origin of the fold is extremely important.  They tell you where the folds ought to be placed. Pinch points and support points tell you what you need to know.

Support Points

Support points or anchor points have to do with gravity.  Any loose cloth is draped, supported or anchored up from somewhere. Once you pin point those places you can then create the folds which are created from those  points:


Pinch Points

However, people tend to move around. We bend and twist. This causes our clothes to pinch up in places. These pinch points cause folds to happen, BUT they almost always point to a support, or anchor point:

Using Folds to Describe Form

Yeah, so far, that's a lot to keep track of. Well, there's one more very important thing that you need to be aware of as well when doing folds on clothes.  They work best when the folds reinforce the form they are covering or are draped over.

Remember how I talked about the arm and leg direction and keeping it consistent and clear? Part of the way you do it is with folds:

This is in spite of the fact that, in reality, folds sometimes go AGAINST the direction of the form beneath. This is where we take artistic license and h adjust things so that we don't confuse anyone looking at our drawing.

Costume and Clothes Ideas

If you're saying to yourself, "okay, that's a lot but I think I understand, but my problem is, when I draw clothes on my characters, they look generic and often uninspired. How do I know what clothes to give my characters?"

It's simple, look around you. People are wearing clothes all around.  Look online, search for the type of clothes you may want to have your characters wear.

If it's historical, fantasy or science fiction, then you look online for reference for that as well.  Anything fantastical or from a science fiction background should be some amalgam of contemporary and historical clothing anyway.

That way, it has an element of truth to it.  That's what designer for movie and tv show do.

Do some research. It's that simple.

Applying The Folds to Cartoon Styles

When speaking of folds in cartoons, simplicity is the name of the game. The overarching theme in all these styles is how they simplify the folds.

Freddy Moore

Freddy Moore style, out of these three styles has the most balanced amount of simple folds.  Not too much so that it's representational but not so simple that the folds are still there.

This makes it so that balancing the amount of folds can be tricky but they also look just right when you nail it:

Turnarounds


Bruce Timm

Bruce Timm Style folds fluctuate a lot. Sometimes they're so minimal that they practically don't exist, while other times they can be quite elaborate.  It really depends on the type of drawing you're making and how simple you want to go with it.

In the examples below, I show you how folds can be drawn in the style in case you actually want to see them:

The turnarounds below, basically have no folds at all.  This is, more often than not, the default folds of this style...

Turnarounds

Takahiro Kimura Anime Style

Kimura style is by far the most elaborate.   It really tries as best as it can to be representational when it comes to folds. Still, there is some level of simplification to this style:

Turnarounds

Share this:

  • Tweet
  • Reddit
  • Share on Tumblr
  • Email

Like this:

Like Loading...

Comments Off on Cartoon Clothes Formulas

Cartoon Feet Formula

January 31, 2018 in Intermediate, Lvl 1

Cartoon Feet Formula

Feet are often one of the most neglected parts of the body when it come to drawing. It's not that they aren't important, it's just that they aren't very "glamours." Also, most of the time they're covered up completely by shoes so we don't even get to draw them as much as everything else.

Still, we should know what's going on inside the shoes. And women often were shoes that expose their feet so, we still need to know how to draw them.

In this lesson, we'll do just that.  I'll share with you the three part formula that helps me draw feet, plus more. In this lesson we'll go over:

  • Very basic cartoon Feet
  • Three Part Foot Breakdown (include ankles)
  • Toes  (Stairs and pointing in)
  • Applying The Formulas to Different Styles (Freddy Moore Style, Bruce Timm Style, Takahiro Kimura Anime Style) with Turnarounds

Very Basic Cartoon Feet

For the most part, in it's simples form, as long a your cartoon feet drawings are made from shapes with a flat bottom surface and some sort of incline leading down to the toes, you should be okay. For example:

That's all there is too it. However, if you want to get a little bit more naturalistic, then you may want to try this formula...

Three Part Foot Breakdown

The first thing you need to do when drawing the foot is to have a base shape to create the rest of the foot on.  A foot can be broken down into two simple flat graphic shapes.

The foot from the side can be drawn as a triangle, and the foot from the from can be drawn as a modified box with a connecting bottom triangle.

The triangle favors one side more than the other.  The inside part of the foot will have the shorter angle.

Once you've got that down, you've got a foundation on which to create your more solid forms, of which there are five parts.

  1. The main body of the foot.
  2. The heel.
  3. The toe area.
  4. Ankles
  5. Toe Breakdown

The main body of the foot

Main larges form that take up most of the foot is an oddly shaped tube. It look something like this:

It's like half an arch.  Or even half a cave, because one side has the arch while the other goes down to the floor.

The Heel

When you add the heel, it goes right into the cave as if it's a pillar of support. But there's an area of space still left:

The Toe Areas

The area where you will put in the toes is shaped like half a disk that wraps around the front of the main cylinder.  It assumes the a softer version of shape of the triangular lay in. One side is a little shallower than the rest.

Ankles

Although this is essential the main foot formula, there's on thing I should bring and that's how you connect the leg to the foot, namely the ankles.

You can think of the ankles as a hinge with really large bolts sticking out from either side. You attach the curve of the main body of the foot to the ankles.

However, there's something you need to be aware of with this "ankle hinge." when looking at it from the front or back you will see that it doesn't line up.  One side is higher than the other.  The inner "bolt," is higher than the outer.

Making sure to draw the ankles that way, will make your feet look more natural.

Toes

Once you have the general foot forms drawn out, you can start adding toes. A helpful way to draw toes is not just to draw them like balls or boxes but to draw them like steps.

Step like this. First you step is a shape like this.  Kinda like wienie shape with a flat top.:

Then you create a step. It's not a perfect step, there's a slant to it and it's shallow:

From here you can add the toes nails  the details:

You can do this with all the toes, just making each toe small as you go.

Now there's something I should note.  (1) Say you're looking a the foot from the top:

(2) just like drawing fingers on the hand, you should place them in an arch.

(3) The other thing to keep in mind is that the toes look best then they turn inward toward each other. So the big toe slants toward the little toes, and the little toes slant toward the big toe.

Keeping these things in mind as you draw feet will really help make your feet drawing "feel" right.

So when you're all done you end up with something that looks like this:

Applying The Formulas to Different Styles

Now it's time to show you how this formula can be applied to our three goto styles.

When doing my homework on most of these styles, I found that feet where almost afterthoughts.  Very rarely where feet more than just a shape with some lines for toes.  Sometimes they didn't even bother with the lines for toes.

That said, there are a few exceptions, like moments where the feet are the focus of a shot, or when a character is barefoot as part of his design, like Disney's Tarzan. And speaking of Disney characters lets start with...

Freddy Moore Style

In the cases where a Disney and Looney Tunes character's feet are more than just a graphic shape, the design of the feet tend to be very simple.  Except for Disney's Tarzan, as I mentioned before. His feet are extremely well designed, anatomically accurate but still cartoony and exaggerated.

So I'll show you four examples of Freddy Moore Style feet:

The simple shape foot with not details:

The foot with toes:

Caricatured foot. This version of the foot has the most anatomy:

and Looney Tunes foot.

Turnaround

Male

Female


Bruce Timm Style

The Bruce Timm style feet are even more simple. Hardly any detail at all:

Turnarounds

Male


Female


Takahiro Kimura Anime Style

In Takahiro Kimura anime feet, toes are extremely simplified. Almost like Bruce Timm feet.  Just a tad more definition in the foot shape:

Turnarounds

Male

Female

And that's it for the feet.  I hope you can see that feet aren't too difficult to draw in cartoons. However, just because they can be drawn simply doesn't mean that you shouldn't give them some thought and structure.

Share this:

  • Tweet
  • Reddit
  • Share on Tumblr
  • Email

Like this:

Like Loading...

1 Comment »

Cartoon Legs Formula

December 6, 2017 in Intermediate, Lvl 1

Cartoon Legs Formula

Arms and legs have a lot in common when it comes to drawing them.  The thought process behind drawing them are very similar.  The biggest difference between the two are the muscle masses.

Otherwise, the approach to both arms and legs have a lot of overlap as you will see.

In this lesson, we’ll be tackling:

  • Simple Cartoon Legs
  • Leg Drawing Formula
  • How to Apply the Formula to Different Cartoon Styles.

Let's get started:

Simple Cartoon Legs

Cartoon legs can be simply broken down to rubbery rectangles or long triangles. After deciding the type of legs you will go with, you can then add dimension by making them cones or tubes.

Depending on the type of legs you choose to draw, you can bend them like a hose or you give can give them corners at the knees:

As well as making them thin, fat.

Of course putting straights versus curves is an appealing way to vary the type of line work on when drawing them.

Experiment until you find a variation that you like. Especially with very simple cartoony legs:

As is usually the case, it's only when you're going for a more naturalistic look that things start getting more complicated...

Leg Drawing Formulas

Now I'll breakdown a very simple formula for drawing legs.  It's essentially the same formula for drawing arms. Just like with arms it's a straight or slightly tapered tube:

Just like with arms, when the legs bend you break up the tube into two slightly tapered tube connected at the bending point.

Again, just like with arms, in order to make sure the legs have an organic feel, it's a good rule of thumb to give the tube a very subtle curve of some sort.  Either an slight “C” curve or “S” curve.

Once you have this foundation, you can start adding solidity.

The next step in an out stretched leg is to draw a shape to indicate where the kneed is located.  I tend to draw an oval.  I draw it, roughly, about half way between the top of the leg and where the heel of the foot meets the ground.  I'm usually not really precise about this. I tend to "eyeball" it.  In very cartoony characters this can be modified to any proportion that suits your leg design.

Second, turn the two graphic lines into a cylinder by adding directional lines.  These lines show you the direction of the perspective of the leg you’re drawing.  BE CONSISTENT.  If you’re indicating that the direction of the leg is going in one direction, it’s impossible for you to see another part of the same leg going in the opposite direction, without it turning:

Once you have this foundation the rest comes down to your knowledge of human anatomy.

I won't go into the anatomy here. You can study that on your own for now, but I can give you a few tips.

As with arms, avoid symmetrical leg muscles. They tend to look very inorganic when they’re symmetrical. Instead, interlock the asymmetrical muscles as we did with the arms. In other words: Stagger the bumps:

And of course, you can't go wrong with designing Simple vs. Complex muscle groups:

Now let’s take a look at how this formula works in different styles…

How to Apply The Formula To Different Cartoon Styles

Using the formula above, all you need to is find the "rules" of the style you want and you can apply it to your basic foundation.

Freddy Moore Style

The Freddy Moore style has two type of legs, the Disney Feature type legs and the Looney Toons type legs:

  1. The Disney feature type are far more naturalistic.  Muscle symmetry is avoided. They are simple, subtle and muscles are not overly defined.
  2. Looney Tunes type legs are far more simple. They're mostly just slightly tapered tubes. The exterior "C" curves are often more exaggerated than the interior.

Bruce Timm Style

Unlike the arms, The Bruce Timm lrgs are not quite “B” shaped, or at least they don't tend to be in most views or in most characters.  They are sometimes.  More often then not though, they look like this:


  1. The upper leg can be "D" shaped tapering as it get's to the knee. Once you get to the calves, they curve down on both sides. The curve on the exterior part of the leg being a big bigger than the interior one.


Female legs tend to be wider in the upper thigh area then male legs as seen below:

Takahiro Kimura Anime Style

The Kimura anime style legs are slightly more anatomical looking. It’s best when drawing them to know leg anatomy.

  1. Male legs tend to have more defined muscles then female legs in this style, which makes them slightly harder to draw. But they tend to be simpler on the exterior part of the leg than the interior.

And that's it for legs.

Share this:

  • Tweet
  • Reddit
  • Share on Tumblr
  • Email

Like this:

Like Loading...

Comments Off on Cartoon Legs Formula

Cartoon Hand Formulas

October 18, 2017 in Intermediate, Lvl 1

Cartoon Hand Formulas

To be honest, just drawing hands alone is as complicated as drawing heads and figures.  There's a LOT to drawing hands.  However, you can get away with not going too in depth with hands when you're cartooning.  Depending on how cartoony you're drawing.

In this lesson, we'll go over:

  • Very basic cartoon Hands
  • Hand Burger and Sausage
  • Boxy Hands
  • Hand Drawing Tips
  • Applying The Formulas to Different Styles (Freddy Moore Style, Bruce Timm Style, Takahiro Kimura Anime Style)
  • Turn Arounds

Very Basic Cartoon Hands

When it comes to basic cartoon hands, they can be drawn in just about any abstract way that you can think of.  As long as they can be clearly understood to represent hands.

Here's some fun crazy ways that you can have fun with hands:

If you want a bit more form to your cartoon hands, then you may want to try the formulas below...

Hand Burger and Sausage

I could have called this "The Mitten Hands" because that's the core of what I'm going to show you here but "Hand Burger and Sausage" made me laugh.

This is a very traditional form of drawing hands.  It's really the way I drew hands for many many years. It's really a very simple formula.

First you start by drawing a mitten like this:

Once you have that, you take the top part of the mitten and make figures out of them:

This method is straight out the Preston Blair's drawing book: Cartoon Animation.

The trick to giving these hands a feeling of dimension,  is to think about these these forms as if they are burgers patties and sausages.  The palm area of the hand should be thought of as a slightly flat disk shape similar to a fat burger patty:

And of course, the forms of the finger should be like cylinders with rounded ends like sausages.

Thinking about the hand like this help give it volume.

...hmm, are you suddenly hungry or it just me?

Boxy Hands

If you want the hands you draw to be a little less cartoony and a bit more natural, it's best to get boxy.   It's still helpful to first draw a mitten shape. But instead of drawing the palm like a burger patty and the fingers like sausages, you turn the palm into a flat box and the fingers like long boxes.

What this is doing is defining the hand shapes more clearly and giving it more depth:

This is helpful when drawing fingers because, if you notice, when you bend your fingers, the top of the fingers seem very boxy. This makes your finger drawing more believable.

No, finger aren't boxes, but if you want them to look more natural, after you draw them boxy, then simply round the corner on the bottom half.  And there you go...

The thumb is a unique part of the hand.  You have to draw it as if it's on a special hinge on the palm cover in skin:

Hand Drawing Tips

As I've said before, drawing hands if very complicated.  What I've explained above is merely two approaches that simplify the hand.  However, there's a lost of other factors to be aware of when drawing hands. Below I go over some things to tips that will make you're hand drawings a tad easier and  look better:

Finger Curves

Be aware that fingers aren't the same size.  This may seem obvious but when drawing hands in elaborate positions, this little awareness is one of the first things to go.

One of the reasons to draw a mitten shape is to force the size of the fingers to get smaller on the ends.  However, you also need to follow this same curve on the joints of all the fingers and the top of the palm.

Bending the Hand

One thing you may not notice until you actually take a very close look is that the knuckles and the top "webbing" of the palm don't line up:

The knuckles are located further down.  They line up more with the top mid area of the palm instead:


Why is this important? Because when you're drawing the back of the hand in any position, you don't want to draw the knuckles too high up or you'll lose the padding of the upper palm. Especially when you're drawing the hand bending:

Gesture

I've found that the easiest way to get expressive hands is to treat them exactly like a micro figure drawing.  Since the first thing we do when we figure drawing is do a gesture drawing, I recommend doing a gesture drawing for the hand you're drawing first, then add structure to it after.

This way you get the benefit of seeing if the hand is working before you commit to the complexity of finish up the drawing:

Varying Fingers

Another finger drawing tip is to make sure to vary them up a bit.  Don't draw every single finger on a hand doing exactly the same thing. It looks unnatural:

You don't have to have them ALL doing something different, that doesn't always look good either, just make one of two finger doing something a little different.

Just doing that make the fingers look much more natural.

Use reference, like a mirror or take a photo

By far, the most help thing you can do when drawing hands is to use your own hand as reference.  If you don't know what the hand is suppose to look like in a certain pose, pose it out yourself.  You can do this in front of a mirror, or you can simply look at it.

If you happen to need to look at the hand you draw with, then take a picture of it. It's that simple:

Applying the Formula To Different Styles

Now that we have a basic formula, we can try "clothing," the formula in different styles.  Let's use our go to styles: Freddy Moore, Bruce Timm, and Takahiro Kimura.

Freddy Moore

With Freddy Moore style, you can do the classic "gloved hand" and all it variations simply by using the "Burger and Sausage" approach:

  1. First, gesture
  2. Then you can add the structure
  3. And then finish off the drawing.

It's a very standard cartoon hand.  If you want it to be a tad more real you simply add the fifth finger.

With the naturalistic version, you'll need be more boxy with your structure. Male hands tend to be thicker, boxier and defined than female hands:

  1. Start with a gesture.
  2. Then add the structure
  3. Female hands have far less detail, tend to have less angles, are less square and the fingers usually end in soft points.
  4. Male hand tend to be boxier, with more defined fingers.

Here's the turn around...

Male:

Female:

Bruce Timm

With this style, it's boxier still. But only with male hands.  The hands are also simpler and less detailed.  Female hands are not depicted below since they are essentially identical to Freddy Moore hands.

  1. Start with a gesture drawing
  2. Add the box structure.
  3. In a 3/4 angle like this you will be able to clearly see the sides of the fingers.  I chose this angle for that reason.  Otherwise from the side, front and back, the fingers tend to be drawn completely flat, graphic and with the least amount of detail as possible. Almost as if they're made out of paper, as you will see in the turn around at the end of this lesson. Also, the knuckles are drawn an "S" curve at the base of the fingers.

Here's the turn around...

Male:

Female:

Takahiro Kimura Anime Style

With the Kimura style, essentially the same as a naturalistic Freddy Moore style except the finger nails are drawn in:

Here's the turn around...

Male:

Female:


This is NOT a definitive lesson on hand drawing.  It's just the beginning.  There's a LOT more to learn. This is just a some information to let you get started.

The rest is up to you.


Share this:

  • Tweet
  • Reddit
  • Share on Tumblr
  • Email

Like this:

Like Loading...

Comments Off on Cartoon Hand Formulas

Cartoon Arm Formula

July 19, 2017 in Intermediate, Lvl 1

Cartoon Arm Formula

It's odd to have a body without arms.  Arms and hands are very expressive parts of a figure.  We'll be tackling hands separately. In this lesson we'll be focusing mainly on arms.

Arms, for the most part are very simple to draw.  It's when you want to get muscular that things get complicated.  Either way, drawing arms start off very simply.

In this lesson, we'll be tackling:

  • Simple Cartoon Arms
  • Arm Drawing Formula (two line arms, arms as tubes, slight tapering, rhythms).
  • How to Apply the Formula to Different Cartoon Styles.

Let's begin with the most basic of cartoon arms...

Simple Cartoon Arms

In their most basic form, cartoon arms can be simply broken down to rubbery rectangles. If you want to add more dimension to them you can make them tubes or rubber hoses.

When these types of arms bend you can leave have them curve like a hose or you give them more of a corner. Depends on the style you're going for.

You can make them thin or fat.  Straight or tapered.

You can vary the type of lines that make them up. More often than not, putting straights versus curves is an appealing way to draw them.

When creating arms for simple cartoon characters, simply experiment until you find a variation that you like.

It's only when drawing cartoon characters that are bit more naturalistic that things get a bit more complex.  As we will see below...

Arm Drawing Formula

Once you want your cartoon arm become more natural looking, it helps to have a simple formula as a base for the different variations.  Surprisingly, it's not very different from the simple cartoon arms drawings above.

The most complicated cartoon arms can be broken down to a slightly tapered tube when it's stretched out.

When it's not, you simply draw two slightly tapered tube connected at the bending point.

The real trick to it though is to not be mechanical about the way you draw the tube.  A good rule of thumb is to give the tube a very subtle curve of some sort.  Either an slight "C" curve or "S" curve.  It gives an arm an organic feel from it's very foundation.

Once you have this foundation, you can start adding solidity.

First, you want to make sure to find where your the forearm ends and the upper arms begins.  An proportion rule of thumb is that from the top of the shoulder to the elbow, is longer than the whole forearm.  It's in fact as long as the forearm and the hand together, if the hand was balled up to a fist.  However you can modify this if you choose to design any type of  interesting arm. You're the draftsman.

Second, turn the two graphic lines into a cylinder by adding directional lines.  These lines show you the direction of the perspective you the arm you're drawing.  BE CONSISTENT.  If you're indicating that the direction of the arm is going in one direction, it's impossible for you to see an other part of the same arm going in the opposite direction, without it turning:

This is where practicing your forms comes in.

The guides also help when putting details on the arm, like watches, sleeves or muscle details.  They help you see what direction to draw them in so they are consistent with your established arm perspective:

Once you've go this down, you're pretty much done.  The rest comes down to your knowledge of human anatomy and muscles.

In case you don't know any of that, I will give you some tips.

As a general rule of thumb, avoid symmetrical arm muscles. Arm muscles tend to look very inorganic when they're symmetrical. Symmetrical muscles sometimes look like you're drawing a snow man rather than arms:

I'm NOT saying you should never draw them this way.  There's a style of cartoon that works really well with muscles that looks this way simply because they're very funny looking. For cartoons like that, it's totally fine and very fun.

However, if you're trying for a more naturalistic organic look, this may not be the best solution.

Arm muscles look far more natural when they rhythmically interlock and are asymmetrical. Which leads me to another good rule of thumb when placing anatomical bumps on an arm: Stagger the bumps:

Yet another way to go is designing, Simple vs. Complex muscle groups. Simplifying one side and adding a bit more complexity on the other side, can add interest and often feels natural and looks cool.

Now let's take a look at how this formula works in different styles...

Applying the Formula

As before I want to show you that this simple formula can be the foundation open which any style can be used.  So let me show you:

Freddy Moore Style

The Freddy Moore style has two types of arms.  The Disney type arm and the Looney Toons type arm.

The Disney type looks a similar to number 1 above.  It looks very natural and muscle symmetry is avoided.  The lumps tend to be convex.

On the other hand the Looney Tunes arm, which is number 2 above, a bit more simple. It often uses a concave line in the back of the upper arm. This isn't meant to represent any real world muscles but rather,  it's meant to add an interesting design aesthetic.

Bruce Timm Style

The Bruce Timm Arm is simply a "B" shaped arm.  (1) A simple (gently curved) straight in the front with two "C" curves in the back.  There is some variation in the "C" curves.  These curves are meant to simplify and represent the complex muscles of the arms.

Male arms more often than not tend to be wider that female arms in this style but otherwise, they are essentially the same.

Takahiro Kimura

The Kimura anime style arms are slightly simplified anatomical arms. It's best when drawing these type of arms to know arm anatomy.

Male arms usually  have more defined muscles then female arms in this style, which makes them slightly harder to draw.

Again, take note that all the arms have the same base.

Arm Turn Arounds

Below we have the turn arounds for male an female arms in all three of these styles:

Freddy Moore Style

Bruce Timm Style

Takahiro Kimura Anime Style


Share this:

  • Tweet
  • Reddit
  • Share on Tumblr
  • Email

Like this:

Like Loading...

Comments Off on Cartoon Arm Formula

Cartoon Body Formulas

June 7, 2017 in Intermediate, Lvl 1

Cartoon Body Formulas

I spent a lot of time on cartoon heads.  There's a lot to know about drawing heads.  There's just as much to know about drawing the body. By "body", I mean the torso and hips.

Cartoon bodies can be simplified so that you don't need to go as deep as you would with the head although, for best results, it's good know how to draw a more realistic anatomically correct body.

In this lesson I'll show you some simple body formulas you can use, and how some of those formulas can be modified to draw some slightly more naturalistic looking body shapes. We'll go over:

  • Super Simple Cartoon Body Shapes
  • The Bean and The Bullet
  • The Chest Area
  • The Underwear Hip Shape
  • Modifying the Formula
  • Freddy Moore Body Types
  • Bruce Timm Body Types
  • Anime Body Types.

Super Simple Cartoon Body Shapes

When it comes to cartoon body shapes, anything goes.  Start with basic shapes: Squares, Circles, Triangles. Pull them, push them, make them interesting:

Stick heads arms and legs off of them, and you've got a cartoon body.  It's really dead simple. If you want it too look more solid, add solidity. Give it form.:

Make it up, you're the cartoonist, you make the rules.

If however, you want someone else's cartoon body type formulas, then read on.

The Bean and The Bullet

By far, the most commonly used cartoon body shape is "The Bean." Another helpful shape that I personally like to use is a modification of "The Bean," I'll call, "The Bullet."  It's a shape I learned from my favorite Figure Drawing teacher, Steve Huston. So let me explain these shapes.

The Bean is exactly what it sounds like. It looks like a bean.  It's made up of two spheres. One on top, one on the bottom, separated by a small space, connected by lines on the side.  What you end up with is a modified cylinder of sorts. When it bends, it looks like a bean. This shape is meant to represent the torso and hip area together.

The usefulness of The Bean comes from it's flexibility.  It can be bent, stretched and twisted easily. It can also be modified to create many different types of torso shapes.  It's a fairly standard shape for most traditional, western, animated cartoon characters, from Mickey Mouse and his gang to the Looney Tunes characters.

And once you get used to the simple Bean made of two spheres,  you can change those shapes to cubes, cones, cylinders and wedges to make even more varied body shapes:

The Bullet is similar to the The Bean.  However, it's just a tad more complicated.  It's made up of two shapes, a bullet shaped cylinder facing down, inserted into a soft cornered box hip area. The idea is that the bottom round bullet part of the upper shape immediately creates the shape of the abdominal muscles adding an anatomical feel to your drawing from the start.

If The Bullet is difficult to grasp, you can first start with The Bean and once you have it the way you want, you can convert it to The Bullet after, as you will see in a moment.

This shape is best used when drawing more naturalistic, anatomical cartoon characters such as anime or action adventure characters. But it can also be use to supplement a modified Bean shape to add more naturalism to an exaggerated cartoon shape:


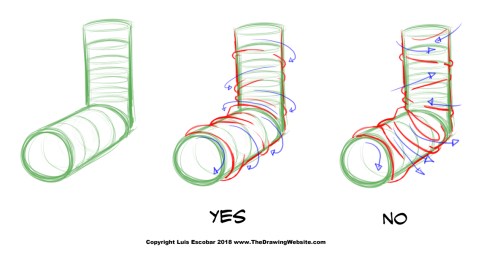
When drawing either The Bean or The Bullet from the side view, don't forget to make sure to the natural rhythms for the body to get a naturalistic convincing look to your characters.

The Chest Area

If you're going to add a bit of convincing naturalism to your cartoons, whether it's to add some pecks or breasts, you'll want to have a simple chest formula to work with.

Here's how I approach the male chest area:

  1. After deciding where to put the center of my torso, I find the area where I think the shoulders will be. I do this by drawing a shoulder line near the top of the bullet shape. I put a dot for the pit of the neck where the center line and the shoulder line connect. I also add two line on the right and left of the pit of the neck for the neck.
  2. I decide where I want the bottom of the pecks and draw a line wrapping around the form there. This is different for every character.  I also add arm tubes that connect to the shoulder line.
  3. I then connect the bottom corner of the pecks to the shoulders and end up with a shape like this. This is NOT anatomically accurate but it's a helpful guideline that can be adjusted with the particulars of each character.
  4. Now here's where it get interesting.  Starting near the bottom of center of the pecks draw a rhythm  line the travels up the center and turns before it gets to the pit of the neck.  This line travel over to rhythmically create the shoulders.  This connects the chest area with the shoulder creating a unified shoulder girdle.  Once that's done, you can add two concave lines from the neck to the shoulders to create the shoulder muscles. If the male is very muscular, these line would be drawn convex.
  5. And that's it. I have a male chest lay in.  This is enough of an under drawing to start.

But what if you want to draw a female chest area? Well, it's pretty much the same thing with some slight adjustments:

  1. You start exactly like the male chest, with a shoulder line, pit of the neck and neck.
  2. Then you draw the arms and the bottom of the pecks.  Yes, women have pecks. Surprise!
  3. Connect the pecks to the shoulders as with the male.
  4. Here's where thing change up a bit. To add bosoms simply draw two slanted egg shape on the corner of each peck. This slant varies depending on the type of bosom.  Like men's chests, not all women have the same type of bosom.
  5. Now create a rhythm line connecting both bosoms to each other and to the shoulders to make them feel as if this whole area part of one unit. Once that's done you draw the concave lines of the shoulder muscles.
  6. And you're done. You now have a female chest area lay in to draw over.

That and variations of that, is all there is to it.

The Underwear Hip Shape

Whether your hip area is more box like or cube like, once you're ready to define it more, you can turn into, what I call, "the underwear" shape.  It reminds me of men's briefs.

This shape is not unique to me.  I got this from The Famous Artist School book on The Figure as well as Walt Reeds book on The Figure.  I found this hip shape comes just as handy for cartoons as it does for naturalistic figures.

Here's what it looks like:

It closely resembles a bowl with two holes cut out on the bottom.

It can be placed on any shape. Like this:

The reason is to better define where the legs will be inserted into the area. I'll show you how this helps once I start writing about the legs.

The Formulas In Action

Once you have these elements down, you can start modifying them to create all kinds of different body types and styles. You can make animals, different types of men, different types of women. It's up to you and your experimentation.

Let's see how these formulas work using some popular cartoon styles...

Freddy Moore Style Bodies

The Bean is pretty much the foundation to most of the Freddy Moore style. It's very easy to see in Looney Tune type characters and Mickey Mouse type.  But you can also see a more advance, more naturalistic version of the style in Disney animated features.

Below is a Looney Tunes type body.  I didn't add chest or bellybutton details because this body can be used to make bunnies, cats, dogs, mice...etc, as well as people:

  1. It's simply made of two balls, top one about half as big as the bottom.
  2. Which you then connect together.  Adding some form and direction.
  3. And you have the body type.

This is not "the only" Looney Tunes body type but it's a very common one.

If, however, you're going to for a more Disney princess type, here is a simple archetypal body formula for that:

  1. Again, two balls. This time, the top ball more egg shaped and only slighting smaller than the bottom one.
  2. Except this time you join them with two "c" curves that bend inward creating an hour glass shape.  Adding direction, pecks and a small ball on the chest to define the bosom.  Usually the bosoms aren't big. Don't forget to add the underwear hip area.
  3. And that's it. The final body type is usually very simple without a lot of anatomical detail.

Remember, this is a body formula not an absolute.  The final result can vary greatly depending on your needs.

Male bodies that are in this more Disney type look, differ far more. so there isn't just one body formula that you can adjust from. However, the body type below should be helpful.  Below is just one:

  1. This one top ball is much bigger than the bottom.
  2. Again, connect the balls flattening out the shoulders. Make sure to define the forms and direction plus add pecks and hips.
  3. And that's it, you've got a dude.

Now let's see the bullet in action using a more action adventure style...

Bruce Timm Style Bodies

Similar to the Freddy Moore Style except I found that using The Bullet works best for these as a foundation.  The construction would look something like this:

  1. First start off with a regular Bullet shape. Making sure the hip shape flares out.
  2. Then add the "underwear" shape, chest rhythms and the shape of the Latissimus Dorsi (Lats). Which gives the torso the exaggerated hour glass shape. Notice the triangle shape created to the shoulders is much wider than the hips
  3. And you're done.  Simply draw the final details, leaving out most of the construction.

The male has a similar process:

  1. Start with the bullet, only don't flare out the hips.  They should just go straight down.
  2. Add the chest rhythms, shoulder girdle, and large modified ellipse for the Lats.
  3. For the final line, just leave some of the details, shown below and you're done.

Just a reminder, this isn't THE way it's on ONE way to draw in this style.

If you want to get even more naturalistic, like with an anime style, you can.  Let me show you...

Takahiro Kimura Anime Style Bodies

The most naturalistic version of the formula comes in play in this anime style. There's far less exaggeration here. The Bullet comes into it's own when drawing in this style. Let's begin with a female torso:

  1. Again, you start bullet shape with the hips flared out.
  2. As with the Bruce Timm style above, you add the chest rhythms and hip shapes.  BUT you don't add the exaggerated Lats.  This style is a bit more natural. Also, this style often has slightly larger bosoms. Notice the shoulder and hips, unlike the Bruce Timm style above, are almost the same width.
  3. Once that's all done, you pretty much get rid of most of the construction and add the top line of the Clavicle.

The male is the same with a bit more anatomy showing:

  1. Start with a bullet.  You may add a tad bit of flare at the hips if you want.
  2. Add the chest Rhythms, hip shape, and Lats.  As large or as light as the type of male you want.
  3. Once that's done, you'll need a bit of anatomy knowledge to put in all the right lines in the right place.  These cartoon type characters tend to be much more naturalistic.

And that's how you use The Bean and The Bullet to draw three different cartoon body types. As you can see, the formula is very versatile.

Cartoon Body Turn Arounds

As I've done before, Here's a body turn around of all three styles. Beginning with...

Freddy Moore Torso Turn Around

Male:

Female:

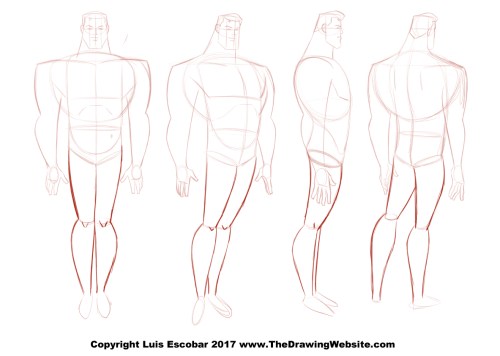
Bruce Timm Style Torso Turn Around

Male:

Female:

Takahiro Kimura Anime Style Torso Turn Around

Male:

Female:

And that's that. You should be able to draw any type of cartoon body you want with the info I've given to you.  Remember, the more you know real anatomy, the better your final drawings will be.

Share this:

  • Tweet
  • Reddit
  • Share on Tumblr
  • Email

Like this:

Like Loading...

2 Comments »

Hair Drawing Tips

March 29, 2017 in Intermediate, Lvl 1

Hair Drawing Tips

Nothing ruins a well drawn cartoon head like ugly drawn hair. Pretty much, what you want to avoid, is the spaghetti hair effect. You don't want your hair drawing to look like you're just putting down a bunch of lines from the top of the head.  It really doesn't look good at all.

In this lesson I'll show you three simple ways to approach hair that will make your cartoons look far more professional.

This tips will are:

  • Creating a clear hair line and hair shape.
  • Making "Hair Ribbons."
  • Creating highlight shapes.

Before I begin, let's take a look at some very simple cartoon hair examples you can easily use even now...

Simple Cartoon Hair Examples

These examples do follow some of what I'm going to talking about in this lesson. At this point though, if you want to start drawing hair, you shouldn't get too intimidated.  Just start drawing what you think looks good.  You can apply the info from this lesson if you want to finesse your drawings:

Creating a Clear Hair Line and Hair Shape

This is something I learned Figure Drawing and it helps when drawing cartoons a lot.  What you're going to be doing is an extension of  what we learned in Lvl 0 Designing Simple Cartoon Characters with Flat Shapes.

You're going to design your character's hair using flat shapes until you come up with something that seems right to you. This includes defining where the hair line is.

Why?

Well, because when we look at a person in real life, we don't see every individual hair strand.  What we see is a mass of hair that creates a certain shape.  We recognize it as lot's of hair and we notice it's texture but our first impression is it's shape.

When drawing cartoons, we simplify this even more and imply hair with hair shapes.  They can be simple or complex, depending on the style of cartoon.

Here's what I mean:

Believe it or not, when I'm life drawing a person's hair, I begin by simplifying the hair into a flat shape and defining the hair line so I can get a handle of what I'm going to draw.

For the simplest of all cartoon hair types, you're basically done.  You really don't have to go any further than this.

However, if you want to take further, you can start adding a bit more detail and move to the next step.

Making "Hair Ribbons"

Instead of drawing every single strand of hair, it's helpful to separate hair into clumps.  Similar to ribbons.  They can look flat, thick or pointy. Whatever works you need them to be.

Here's an example of what I mean:


In order to put them on the head, you pay attention to the hair's origin point.  This is one reason you define the hair line.  It's a point of origin:

Once you find these origin point you create ribbon shapes within the hair shape you've established.  You're essentially defining the way the hair flows.  You can make this simple or complex, it's up to you:

There's is no right or wrong here, you it either looks right to you, or it doesn't.

Creating Highlight Shapes

You can now begin to create highlight shapes, if you want.

Here's the thought process on how to do it:

Using the hair shape we've already established, here's how I place the highlights:

A good rule of thumb is, "less is more." If you can get away with one highlight, you're good.  If you need more than one, then add another.  If you find you need even more, you're in danger of over doing it.

However, this does depend on the style you're after.

And that's it, that's how you do hair.

Now let's take a look at how these three hair drawing tips work within different naturalistic cartoony styles.

Cartoony Hair Styles

And here's turnarounds for all three styles:

And that's what I have to say about that.


Share this:

  • Tweet
  • Reddit
  • Share on Tumblr
  • Email

Like this:

Like Loading...

Comments Off on Hair Drawing Tips

Cartoon Ear Formulas

January 18, 2017 in Intermediate, Lvl 1

Cartoon Ear Formulas

Out of all the features on the head, ears are treated most like an afterthought.  I know that I ignored them for most of my drawing career. It's rare when anyone really pays too much attention to a drawing of an ear, unless it's just down right terrible.

It doesn't really help that cartoon ears are almost error proof. You can almost draw anything, call it an ear and you're done.

When it comes to drawing more naturalistic cartoon ears, you can get away with knowing pretty much nothing about ear anatomy and end up with  a good drawing of an ear. Because of this, I won't breakdown an ear anatomically in this lesson.  But what I will do is give your some compound form formulas you can use to draw a solid looking three dimensional looking ear on a naturalistic cartoon head.

I will also show you some simple details to use when drawing in Freddy Moore, Bruce Timm and Takahiro Kimura styles which you can draw on the formula. However, before I do, let's take a look at some simple cartoon ears.

Simple Cartoon Ears

Here are some examples of common cartoon ears.  These are the simplest kind of ears you can draw:

This is not an exhaustive example.  You can find more by looking at other cartoons and you can even make up your own.

Naturalistic Cartoon Ear Formula

If you want to draw something that looks just a bit more natural and a bit less cartoony, the formula below ought to help:

That's basically it.  With this you can add any style on top and you can get a decent looking, naturalistic, cartoon ear.

Ear Styles

Let's take a look at the formula in action.  We take the D shaped wedge formula, then we add three different styles to it:

And for the sake of completion, let's take do a turn around of all the head types:

Freddy Moore:

Bruce Timm:

Takahiro Kimura Anime:


That's the ear formula.

Share this:

  • Tweet
  • Reddit
  • Share on Tumblr
  • Email

Like this:

Like Loading...

Comments Off on Cartoon Ear Formulas

Cartoon Mouth Formulas

December 14, 2016 in Intermediate, Lvl 1

Cartoon Mouth Formulas

mouth-drawing-formulasOut of all the formula topics, mouth formulas are what I've studied the least of.  There are different types of mouth designs but overall the real trick to drawing mouths comes down to only one formula and then the rest is cheats and stylization.

To this end I'll go over only three topics:

  1. Simple Cartoon Mouth Designs
  2. General Mouth Formula
  3. Naturalistic Cartoon Mouth Styles

The Freddy Moore, Bruce Timm, and Takahiro Kimura Anime styles won't have their own section this time because these mouth types aren't different enough from each other.

Simple Cartoon Mouth Designs

At it's most basic, cartoon mouths can be represented, on a face, in two ways:

two-basic-type-of-cartoon-mouths


As long as your mouth seems to represent an open or closed opening on the bottom part of the face below the nose, you're doing well.

Once you have that working, that's really all you need.  These lines and shapes come in all kinds of varieties. Far too many to show here. It's really up to you which type you choose to borrow or invent for your needs.

The sky's the limit.  Below are SOME ways to draw cartoon mouths. This is just a sample and by no means do they represent all the variations you can create:

simple-mouth-samples

Cartoony mouth shapes have far more variety than more naturalistic mouth shapes, as we will see below.

General Mouth Formula

Alright, say you want to go a bit further with drawing mouths.  You want the mouths you draw to look like they're more than just stickers on the head.  You want to draw a mouth that looks a bit more natural.

Well, you'll need to know just a little bit about drawing natural mouths. Here's a few things to keep in mind when drawing more naturalistic mouths1-mouth-pivot-points:

2-mouth-front-of-the-lips


3-top-and-bottom-of-the-lip-thickness

4-mouth-wrapping-and-bottom-lip


5-teeth-inside-mouth-simplification

6-simple-mouth-formula-breakdown

Naturalistic Cartoony Mouth Styles

When I say "naturalistic," what I mean to say is Freddy Moore Style, Bruce Timm Style, Anime Style. When it comes to drawing mouths in these styles there isn't any real change in formula.  Once you have the five things I wrote above in mind, you simply apply your preferred style on top.

More often than not, when it comes to mouths, the styles don't differ almost at all. With a few exceptions which I will get to later. So let me show you.

Let's just draw any old mouth type using the formula above:

generic-mouth

Now we simply add the style convention of each style, which don't often differ:

freddy-moore-bruce-timm-and-anime-style-mouths

So really, that's all you need.  Nothing too fancy right?

The one exception is anime style.  There are some mouth stylizations in anime that have become anime conventions.  Conventions like:

anime-mouth-variations

Just to name a few.  There's a whole library of different types. These can be chalked up to putting a cartoonier mouth on a naturalistic cartoon head.

For completion's sake, I'll add a mouth to the Freddy Moore, Bruce Timm and Takahiro Kimura head turnarounds:

freddy-moore-mouth-turnaround

bruce-timm-style-noses-formula-turn-around-mouth

takahiro-kimura-mouth-turnaround

Have fun drawing mouths.


Share this:

  • Tweet
  • Reddit
  • Share on Tumblr
  • Email

Like this:

Like Loading...

2 Comments »

« Older Entries

WELCOME!

If you’re embarrassed because you can’t draw a straight line or even a good stick figure. If you WANT to know how to draw but don’t know where to begin — you’ve come to the right place.

19 year industry professional animator and storyboard artist Luis Escobar will teach you what you need to know as if you’re where learning Kung Fu. Only you’ll be learning to draw.

So click on the “If You’re New, Start Here” page below and get started.

You can email me at: TheDrawingWebsite(at)gmail(dot)com

If you’d like to send me a donation: paypal.me/LuisErnestoEscobar

Pages

  • If You’re New, Start Here
  • Lvl. 0
  • Lvl 1
  • Lvl 2
  • Join Draw Fu Course
  • My Account
    • Logout
  • Recommended Reading
  • Shop
  • Checkout
  • Cart
  • About The Author

Most Read Posts

  • Draw Fu Guide to Sketching And Gesture Foundations

Search this Site

Blogroll

  • Evan Lewis' Blog
  • Evan Lewis' Story Portfolio
  • Luis Escobar's Blog
  • My Patreon Page
  • My Youtube Channel

Draw Fu Products for You

  • The Art of Draw Fu Acolyte Bundle
    Rated 5.00 out of 5
    $60.00
  • The Art of Draw Fu Beginner's Bundle $40.00
  • The Art of Draw Fu: Beginners Level (Print Copy, Signed) $25.00
  • Drawing Good Girls with Adam Hughes. $30.00 Original price was: $30.00.$14.97Current price is: $14.97.
  • Draw Chi Recommended Zentangle Books.
  • Top


The Drawing Website is proudly powered by WordPress. WordPress Themes X2 developed by ThemeKraft.
%d